Tuesday, July 14, 2015
Renewing the Blog
I am coming back to my blog. I will be posting most of my stuff here. I know it will take time for my friends to come back and that's ok. Facebook is fine but the blog was always a good thing. I will be back tomorrow with new stuff....food, knitting, quilts etc...


Thursday, January 22, 2015
AFRICAN FLOWER CROCHET BULLDOG


Hello Bloggers, it’s been a while since I posted on here, so
I thought I would return now and then for those of you who don’t do Facebook
lol.
This is Max, a beautiful, colorful, African Flower Bulldog. He
is crochet using the African Flower Motif, not a granny square. He is made
with, hexagons, pentagons, triangles, octagons, squares, and the seven petal
one…..
I know he looks complicated but he is very doable. The instructions
and illustrations are excellent. Anyone who crochets can do this. The designer
for this pattern is, Heidi’s Bears.
I will show you several areas of his body so you can see how
he comes together. He is bigger than the pattern because I don’t listen very
well lol.
He is supposed to be made with fingering yarn and a 1.75
crochet hook but I had all this needle point yarn and had to use a larger
needle, so there you have it.
I love him! I love his large size, he make a statement and
sure shows of all my lovely colors.
Wednesday, June 25, 2014
The Angel of Death


 First I dip my brush into the varnish and apply the color. I do this for every brush load. Here you see the bottom half of her after the dark has been added and then some color.

Here is the front at stage one and here is the back.
 Next I will glaze on some tints with Decoart American glazing medium and the Traditions Paint with is a pure pigment. http://www.traditionsartistacrylic.com/
To be continued....
Painting the
Angle of Death
Ok, I see I haven't blogged forever since last year November. Well, you all don't comment so I think you don't care, hahahhaha
Anyhow here is something new. I told my neighbor, who was moving, to just
throw this grey angel in my yard if she decided to not take her. She promptly did so after
her children told her they were scared of it lol.
I sealed the Angel and base coated her with any color, doesn't matter as it will change. I just wanted to get some paint in her and cover the grey.
I will be painting the Angel using,
DecoAmericana bottled paints, in many colors and I will tell you how I am doing her. I have a big tub of water
out, a tub of Extender, and a tub of varnish, a 2 inch brush for extender and
water and a 1 inch for painting, so far go good.
I have pulled out many colors
of reds, purple, blues, yellows greens, whites.
I will show
pics as I go along with it for your enjoyment. I will also tell you how I am
doing it, so you can grab a yard piece and do your thing too. I love lots of
colors as all my painting friends know and lots of color is going to go on this
piece
.
I am going
to give the front of the Angel a coat of Extender and make sure it doesn’t
puddle, I just wipe my hand over it and adjust here and there, I will include
the front of the wings too. Any paint that falls on her foot, wings, face, will
stay right there. I will just blend it in with the brush. This is going to be
Artistic License and so fun for me. I love to paint this way.
I have her
on my cutting table (as I am not sewing for a while). I actually have three
painting stations. One in front, one in the back and one on the side. Excessive?
That’s the America way, I love it lol.
This is the
scene. It’s great to have everything I need at hand. I have one of those huge
wet palettes and I will squeeze copious amounts of paint out, the darks first
and apply those and then start with colors
Here is the front at stage one and here is the back.
To be continued....
Friday, November 1, 2013
Large Chalk Owl
Some time ago, I made an
exchange. A cloth doll for an old beat up Owl from the 50ties. It is made out
of chalk or some substance like it.
Even tho he was so pitiful, I loved him at first sight. He is huge! I decided he had potential. He had traveled all over the USA, New York was his last stay. He had been knocked around quite a bit. I fixed the very large hole under his wing, rebuilt his feathers on that same wing. Patched all his bruises and cracks and formed him some new ears
Even tho he was so pitiful, I loved him at first sight. He is huge! I decided he had potential. He had traveled all over the USA, New York was his last stay. He had been knocked around quite a bit. I fixed the very large hole under his wing, rebuilt his feathers on that same wing. Patched all his bruises and cracks and formed him some new ears


I then sealed him up with that Decoart
Americana, Multi- Purpose Sealer and started to give him a new set of clothes and
bright eyes.
And then there was this pitiful little yard dog with his bone that I got from the neighbor’s garage sale, had to have him too. I rebuilt his tail and patched his cracks. He will get the same treatment as the Owl but his bone will be polka dots
And then there was this pitiful little yard dog with his bone that I got from the neighbor’s garage sale, had to have him too. I rebuilt his tail and patched his cracks. He will get the same treatment as the Owl but his bone will be polka dots
I did a coat of
Multi-Surface Sealer (Decoart) on the Owl, he looks so shinny now and his eyes
got all clear. I then mixed the Sealer and some dark Primer and did the dog.
Doesn't he look so sad? He is a dirty grey and black now lol.

I covered his breast with a coat of Extender, wiped it down and ladled the Burnt Umber that I had mixed with extender on him. Wiped him down and wiped out the high lights. I decided to then add some black under the feathers, which I also did to the eyes to make them recede.
Wiped that down and then added white to high light.


For those who have some statuary lying around and need fixing and painting. I used plummers putty for the fixing up and then I used the Decoart Traditions paint and Mediums. I couldn’t have gotten the effect I got with any other paint as these went on like oils and blended together without any lines etc. I had fun doing this
Thursday, October 24, 2013
Pumpkin Floor Mats

I just
finished painting six green pumpkin floor mats and they have been delivered
already. The mats are vinyl samples and just perfect for this. I did all my
base coats using the Decoart Americana line of bottled acrylics. The pumpkins
got a couple coats of any yellow. Then I switched to the Decoart Traditions
line to finish the pumpkins. I was aiming for simple and bright. I love that
paint, it just does what you want it to do.
You can get the paint here. http://tiny.cc/ci4g5w
You can visit the Decoart website and watch videos and get information about all their products. If you can't find the paint or products in the store you can order directly from them.

For the
leaves, I cut out some shapes in that compressed foam, called miracle sponges and flung it in water to
plump up and then did the touch and press leaves. I just put some greens and
yellow in a veggie tray and pressed the form all over it and then pressed on
the mat. I got several pressings out of one dip as you don’t want them all to
be the same.
These sponges are great, I have used them for years, you can get them here.
I did some
line work, let them cure overnight and applied three coat of varnish


Sunday, October 6, 2013
Painting Gourds, The Red Gourd
The Red Gourd is finished.

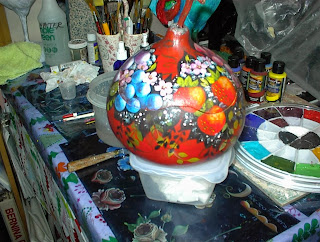


It's the same procedure as the previous Gourd. The only difference is the back leaves underneath and the black pull out out leaves.


It's the same procedure as the previous Gourd. The only difference is the back leaves underneath and the black pull out out leaves.
Subscribe to:
Posts (Atom)

 Posts


