Pages

Friday, November 1, 2013

Large Chalk Owl


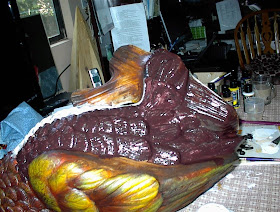
Some time ago, I made an exchange. A cloth doll for an old beat up Owl from the 50ties. It is made out of chalk or some substance like it. 
Even tho he was so pitiful, I loved him at first sight. He is huge! I decided he had potential. He had traveled all over the USA, New York was his last stay. He had been knocked around quite a bit. I fixed the very large hole under his wing, rebuilt his feathers on that same wing. Patched all his bruises and cracks and formed him some new ears


I then sealed him up with that Decoart Americana, Multi- Purpose Sealer and started to give him a new set of clothes and bright eyes. 
And then there was this pitiful little yard dog with his bone that I got from the neighbor’s garage sale, had to have him too. I rebuilt his tail and patched his cracks. He will get the same treatment as the Owl but his bone will be polka dots


I did a coat of Multi-Surface Sealer (Decoart) on the Owl, he looks so shinny now and his eyes got all clear. I then mixed the Sealer and some dark Primer and did the dog. Doesn't he look so sad? He is a dirty grey and black now lol.

 I put all sorts of tints and glazes on him and then painted the front of him Yellow. I just played with lots of color. Yellows, oranges, Burnt Sienna, purple, reds, on his back and wings and lots of White for high lights on his breast feathers.
 

I covered his breast with a coat of Extender, wiped it down and ladled the Burnt Umber that I had mixed with extender on him. Wiped him down and wiped out the high lights. I decided to then add some black under the feathers, which I also did to the eyes to make them recede.
Wiped that down and then added white to high light.
 
 
Here he is all varnished and the little yard dog with his red bone with polka dots


For those who have some statuary lying around and need fixing and painting. I used plummers putty for the fixing up and then I used the Decoart Traditions paint and Mediums. I couldn’t have gotten the effect I got with any other paint as these went on like oils and blended together without any lines etc. I had fun doing this


Thursday, October 24, 2013

Pumpkin Floor Mats

Taking a break from Gourds but not for long lol.
 
I just finished painting six green pumpkin floor mats and they have been delivered already. The mats are vinyl samples and just perfect for this. I did all my base coats using the Decoart Americana line of bottled acrylics. The pumpkins got a couple coats of any yellow. Then I switched to the Decoart Traditions line to finish the pumpkins. I was aiming for simple and bright. I love that paint, it just does what you want it to do.
 
You can get the paint here.    http://tiny.cc/ci4g5w
 
You  can visit the Decoart website and watch videos and get information about all their products. If you can't find the paint or products in the store you can order directly from them.
 
 
For the leaves, I cut out some shapes in that compressed foam, called miracle sponges and flung it in water to plump up and then did the touch and press leaves. I just put some greens and yellow in a veggie tray and pressed the form all over it and then pressed on the mat. I got several pressings out of one dip as you don’t want them all to be the same.
 
These sponges are great, I have used them for years, you can get them here.
 
I did some line work, let them cure overnight and applied three coat of varnish


Sunday, October 6, 2013

Painting Gourds, The Red Gourd

The Red Gourd is finished.


It's the same procedure as the previous Gourd. The only difference is the back leaves underneath and the black pull out out leaves.

Wednesday, October 2, 2013

Painting Gourds, The Red Gourd

To continue with The Painting Gourd Series, here is the Red Gourd. Supplies used are the DecoAmericana Paint line and the DecoArt Traditons line.

I sketched on some strawberries and some grapes so far and based them in with the DA line of acrylics. I then switched over to the Traditions line.

The grapes are blue, pink, green and purple. These are going to be painted on a bed of black leaves.

Here you see the fruit with a coat of white to make the colors bright.


Here is the first shading and highlight. I think this Gourd will have a lot of tiny flowers added to it, those are fun to do.

Monday, September 30, 2013

Painting Gourds, Third Stage


Stage 3: The Pears and  were coated with extender and then shaded with Red Violet and highlighted with Hansa Yellow Lt. More White added and highlighted a second time. The same for the Cherries and Strawberries. Plums and grapes were shaded with Red Violet and highlighted with Aquamarine and more white.

Leaves: I used two greens. Pine Green and Yellow Green Lt and white. I used my round brush for the leaves. I did some curly cues with the #2 liner brush and stippled some fru fru here and there (load the brush with some green, dip in white and stipple here and there).

I dried the Gourd with the hair dryer and put a coat of glazing medium all over it (dilute the medium with a little water.) When dry, I will added some final highlights and tints here and there. Remember, each highlight gets smaller and smaller, leaving the previous highlights showing.
 
This is the results of all the above.


The fruit is nice and bright. The last stage is the antiquing. First I sealed the Gourd with the Multi Surface Sealer and let that dry overnight. Next, I mixed some Burnt Umber, added just a little Red Violet and black. The color should be mainly a reddish brown. .


I coated the Gourd with Extender, wiped it down with a cotton cloth and brushed the antiquing color all over the top, then it was wiped down, making sure to change the cloth around to a clean spot. Then the highlights were wiped out. On the bottom of the Gourd, I antiqued it in sections. Below you can see how the fruit has a mellow look now.
 

I will let that cure for a couple of days and maybe dry with the hair dryer and then give it a couple coats of varnish.

Sunday, September 29, 2013

Painting Gourd, Second Stage


Second stage: I added some glazing medium to Sapphire Blue and a little water and pulled a wash over the plums and grapes. When this was dry, I pulled some extender over them and highlighted the plums and grapes with aquamarine+white and shaded with Burgundy. The shading and highlighting is not side loaded but instead is patted on and blended with the #6 filbert brush. I used my finger to pat here and there and it’s amazing how well the paint behaves, just like oils.

The Strawberries and cherries use the same technique. Highlight with Vermillion and then Hansa Yellow Light and shade with Burgundy.

I did the all the above at least twice. I will now add the leaves and some fru,fru, Glaze the whole Gourd, dry and add the final highlights and tints.

Saturday, September 28, 2013

Painting Gourds Continued


Painting Gourds continued. Ok here is what I did so far. First I drew a shape following line around the bowl, with lines branching off the main line. These lines are actually the branches for the fruits and leaves.


I then sketched some shapes of pears, grapes, plums, strawberries and cherries with a chalk pencil on the gourd. I am just filling it up to get back in shape with my painting.


I base-coated the shapes in Yellow Oxide for the pears, Napthal Red Light for the Cherries, Strawberries, and a mix of Dioxazine Purple and Light Violet (medium color) for the grapes and plums


Use the darker violet, the pic shows a lighter color on the Gourd,  but I have since gone over it with the darker violet.

I gave the fruit three coats. I will add the leaves and fru-fru when I finish the fruit.


Since I don’t’ know what colors I will be using in advance. I just pick it at the time when I need it, so just watch as I paint the Gourd and then you can get what you need. Cherries are just circles, Strawberries are like a heart shape with the point round off, plums are ovals and pears are a small and large circle with a connecting curve. I also have a couple lumpy pears lol
 
Remember it will ugly before it gets pretty lol.


To be continued


Wednesday, September 25, 2013

Painting Gourds


I am going to be doing some fun painting on Gourds within the next few weeks and doing a little tutorial for you as I go along, so you can paint along with me.

Gourds go way back and were used by primitive people for eating and drinking vessels. Gourds are also called, “Calabash.” You can put a towel inside them and add biscuits or tortillas to keep them warm. Gourds are useful and decorative.  Fill them with candy, homemade cookies etc. and give as gifts.

 I will list some of the supplies that I will be using, so get you some supplies and get ready to have some fun. You can buy Gourds on the web or locally.


I will be using the, “Traditions” paint line from DecoArt and some of the mediums that go with this line. You can get the starter kit that’s on the site right now. Also you will need a bottle of Varnish, Multi-Surface Sealer and Blender/extender mediums.
Optional: the Traditions brushes #6 and 8 filbert. These brushes have soft bristles and will do pat blending nicely.

http://www.traditionsartistacrylic.com/
http://www.decoart.com/

I will use my regular Americana line to do the first base-coat.

Add some Multi- surface (MS) sealer to any yellow Americana color. I used Marigold and some other yellow mix (any yellow will do). This is just to cover the brown Gourd. If you are not sure how much MS to use, just base-coat the gourd with one coat of the sealer and then do two base-coats of yellow.


I am never in a hurry so I let the gourds sit overnight (you can dry with hair dryer and continue). I then made some mixes with the Traditions (your choice) and gave the gourds two coats, drying well between each coat. You can stipple some other color on top like I did on some of them. Let these sit over night before putting the pattern on.
 
We will use basic shapes to draw some fruit and leaves on the Gourds. You can search the web for coloring pages (If you really need a pattern). Search for, pears, grapes, apple shapes etc. We will keep it simple in the beginning.
 
The large Rooser you see has a basic base-coat and later on I will be painting on him also
 
Until the next post, get ready


Friday, May 24, 2013

Shakespeare in the park Quilt

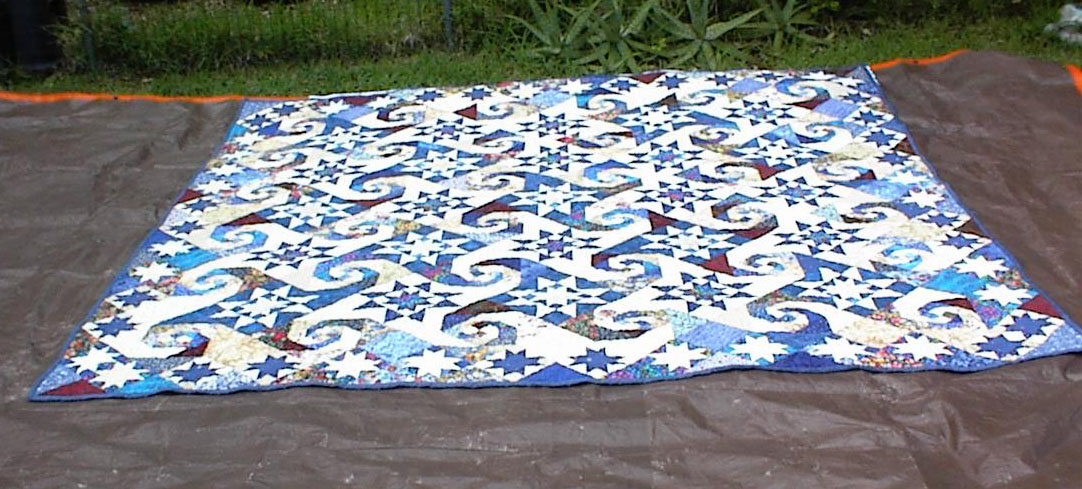
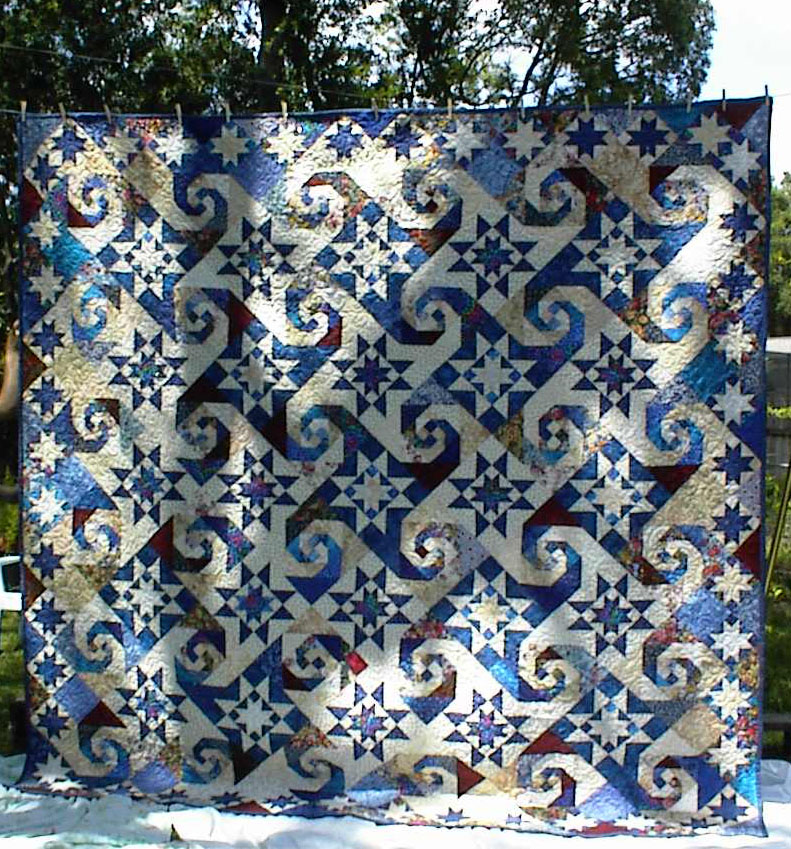
Ok, these are way better pics. John rigged up a couple poles on block and we pinned the quilt to the line. You can see the effects real good now of the reels and the stars.


Wednesday, May 22, 2013

Shakespeare in the Park Quilt

I have finally finished this lovely quilt. I love the way it turned out. It is King size 112x112. Lots and lots of blocks. I have to take a break now lol.

We took pics of it outside on a tarp but I don't really like the ground look. Later we will rig something better up and I will update the pics.


Tuesday, May 7, 2013

CROSS SCRAP QUILT


Click to view large image


Another Diversion and a little memory trick.

There will be two post today to make up for a few days I missed lol. After I finished the B. S. I went back to working on Shakespeare I P. I did a lot of sewing and got distracted again while reading the Quilt Board.

I saw this Charm quilt and loved it and decided that would be my current diversion lol.
You can go to the following link, print out the color pic for reference of placement and if you join the site, you can download the specs.
http://www.allpeoplequilt.com/magazines/americanpatchworkquilting/charming-addition-size-chart_1.html

Anyway, I cut 360, 2.5 squares, all out of my scrap bin. It can get real confusing if you don't have a method, so here is my little memory trick from a childhood joke.

Two little candy thieves were in the cemetery counting out the candy they stole (at night). They had an odd number of candies, so they left one outside the gate and whoever got to it first, would claim it. They were sharing it out saying, one for you and one for me etc. A couple kids were passing and heard them. The one kid said, looks like God and the Devil are sharing out souls... One for you and one for me , and now for the one outside. Well needless to say, those kids ran like the wind.

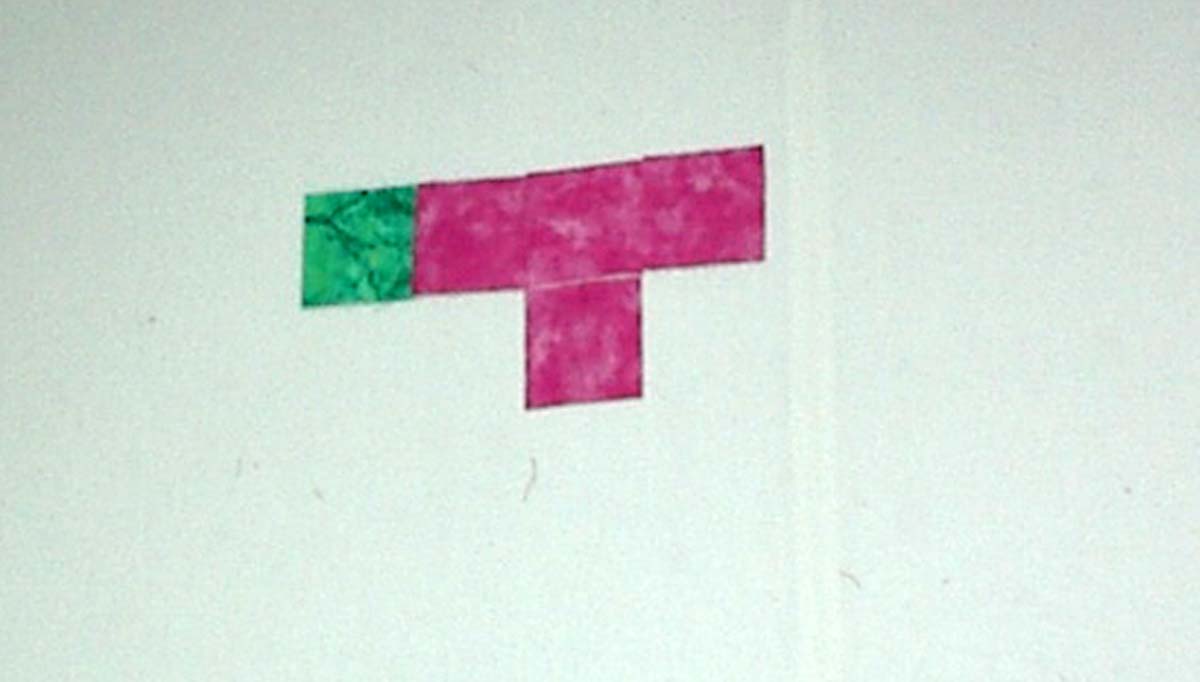
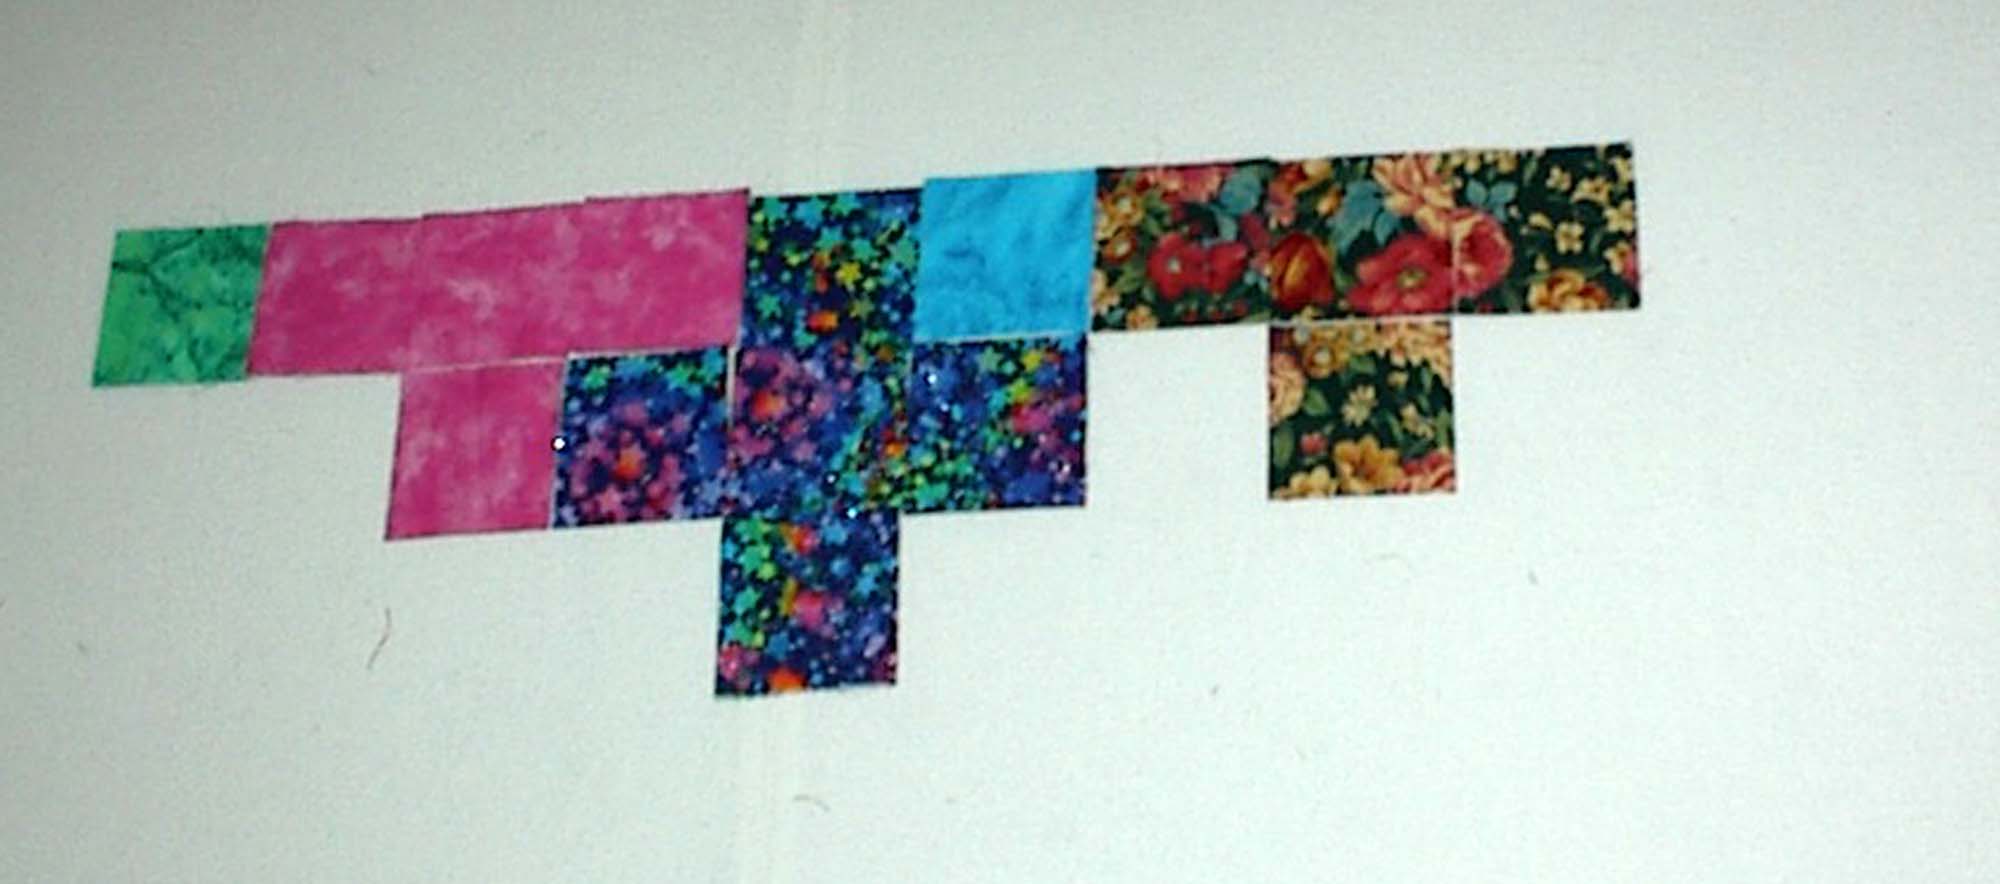
Now back to my method of placing the squares. I studied the set up and decided that starting from the left, would be a T, then a Cross, and then one outside, a T a Cross, one outside and so on and this helps me to get it right. Now when going down the side on the right, it's the same as the top and this is where the other half will join as this is only one half of the quilt.

On the left of the quilt, it's one outside, then a T, one outside, a cross, a T, one outside and so on. Bear in mind that I am looking at the side squares with the T's and the Crosses going to the inside. I will up load pics.

I don't just go across one row, I do the right side and the start building the Crosses right away so I can see what they look like and change. I go all the way to the right and build that line and so on.

In the first pic you see the one outside and a T. The second pic shows the Cross added and the fourth pic shows the one outside.
Click to view large image
Click to view large imageClick to view large imageTo continue, the first pic shows some more placement, the second pic shows more building in the middle or wherever I needed a Cross... The T's and outside squares only go on the sides and top so the rest you know is just Crosses and it's a lot of fun once you have you method down, of course it helps to have that colored pic.

The third pic shows where I am now, I will start the sewing before I cut some more to place as I don't want to lose what I have so far, they could all fall off the board lol.

The fourth pic shows the squares cut and on a plastic sheet for ease of carrying.
Click to view large image


Click to view large image


Click to view large image


Click to view large image


 I took down six rows down and eight across. I put these on my plastic palette and being real careful of the fan lol, I start to speed sew the squares this way. I will only speed sew one row at a time.

I start at the end by me, on the right. Fold over the last square over the next one, sew....do the next two etc. I do the 4's and the set of 4's. Then when I clip them apart, the first one I clip goes to spot 1 on the left and so on. Then I do row 2 and so on. This way, you will be able to see that they match. After I finish that section, I take down another besides it. ...so in all I have taken down three sections of 8 across and six down. I haven't sewed the rows together yet.

The first pic shows the squares the way the appeared on the board on my tray.

The second pic shows the 8x6 section of squares sewed together.

The third pic show the top section of 6x24.

Click to view large image


Click to view large image

Click to view large image

I forgot to mention that each Cross takes 5 squares, except for the sides and top and bottom, those take four. When I cut the squares out, the odd ones that were left, I put those in a different pile and used those for the one outside, as they don't have to match anything.

I sewed one section all together to see how large it was. It measure 50 inches. I would like it to be at least 60 or a little more...60x60 is a nice size.

It is important to always leave two or three rows undone so you know where you left off. I will make another 12 inch piece to add to the side of the finished one and will continue that amount on the undone rows also. I had to check to make sure that I had some of the same fabrics left to finish the side blocks and I did wheeeeee

I cut a punch more squares, as I ran out lol. and more 2.5 strips to cut now. I can't imagine how much scrap I have in that bin. It is amazing how many free quilts are in there. When you think, that it cost about 100.00 to make a quilt top...yet when you make a scrap quilt out of the bin, it is so satisfying and if you were in the market to sell quilts, I bet you get more for the scrap, than the planned quilt lol.


Click to view large image


Ok, I finished that one piece of 60 by 48, now I will make a 12x60piece and add to the side. I love this quilt. I will be using just what's left of the squares and only cut more if I have to.

Click to view large image


I have just finished the top. It is now 60x60. a nice wall hanging. Here are some pointers for those who would like to do this quilt, for a 60x60 with 2.5 inch squares.

1. Try to lay the entire quilt on your board before sewing.

2. Sew the quilt in blocks of 10x10 across the quilt, in other words, 10 squares down and 10 squares across. That is if you are making a 60x60 size, Sew the squares in rows across and then sew the row together to form one 10 x10 block (the block will actually measure 10.5 for the seam allowance).

3. Block each block of 10x10 by spraying with starch and steam with up and down motion into a 10 1/2x10 1/2 block, this will make sure that your quilt is square.

4. You then have your choice of sewing the large blocks in rows across and joining the rows or sewing them down in sections and then joining sections.

5. I will add a 1 inch border, cut on the straight of grain, so it will end up being 1/2 ins. This is to keep the quilt square. I will add another pic after it is quilted and bound.

This was a fun quilt to do and a great diversion for me. Now I must get back to SIP and finished that, this weekend.

Click to view large image

 Here is something neat about this quilt. As I am looking at it, I see a bunch of pink, blue, red, green crosses, these are from my friend Sandy. Then there are some greeny, peachy, pinky, yellow small prints and those are from my friend Karan in S, Carolina and then a few from my friend Elaine. So to conclude, I seem to have a bunch of friends in all my scrap quilts lol.


 .